Here's the do-it-yourself guide to making your own jerky in an oven, smoker, or food dehydrator with strips or ground beef, venison, poultry, fish and even soy protein.
In this article you will find some great hard to find cleaning
and cooking tips, You can Copy and print for quick future references.
CLEANING TIPS
Before washing, it is essential that all stains be removed.
Sometimes Soap or hot water will set a stain and make its removal
impossible.
WARNING: DO NOT MIX BLEACH AND AMMONIA TOGETHER, THE FUMES CAN
BE DEADLY.
Commercial cleaning supplies can aggravate your allergies and
have long terms effects on your health. You can save on your
house cleaning bill with very good results using less toxic
substances.
Ammonia - cuts grease, cleans windows, Strip wax off floors.
Baking soda - cleans, deodorizes, polishes, and removes stains.
Bleach - whitens practically anything, removes mould and
mildew.
Cornstarch - cleans and deodorizes carpets and rugs.
*Rug Stains: Use a solution of half water, half white vinegar.
Shirt or blouse stain: Just a little of water and cornstarch
will remove.
*Grass stains: Dampen stain with cold water, and rub with plain
bar soap. (One without moisturizers). The stain should come
right out. Then wash normally.
*Toilet bowl: use tang, or sprinkle baking soda into the bowl.
Drizzle with vinegar. Scour with toilet brush. Cleans and
deodorizes
Berry Stain: Place the stained part over a pot and pour boiling
water over it from a height of about 2 feet so as to strike the stain
with force. Plunge the stained part up and down in the hot water
until the stain is removed. If stain is persistent, use Javelle water.
Peach Stains: are not easy to remove. Be careful not to wipe
hands with peach-stains on a good napkin, towel or apron. Stretch
stain over a pot of hot water and apply javelle water with a
medicine-dropper. Do not allow it remain too long in contact with
the fibres. Javelle water rots even cotton and linen. Apply
oxalic-acid solution to neutralize the alkali and rinse thoroughly
in hot water. Several applications may be necessary.
Tea And Coffee Stains.
Follow the same procedures as for berry stains above.
Blood and Meat-Juice.
Never put in hot water as that sets the stain. Soak at once in
cold water. Rub with soap and wash. A paste of raw starch mixed with
cold water will remove these stains on flannel, blankets, and heavy
goods. Repeat until stain disappears.
Egg-Stain:
Wash in cold water, then warm water and soap.
Mix 50-50 water, white vinegar. Great for stubborn carpet
stains.
LIGHTSIDE
A man is driving up a narrow mountain road. A woman is driving
down the same road. As they pass each other the woman leans out
her window and yells, PIG!
The man leans out his window and yells, STUPID!
He keeps driving up the Mountain, comes around a corner, and
smashes his car after slamming into a pig in the middle of the
road.
Wood Furniture; To remove water stains, dab white toothpaste
onto the stain. Allow the paste to dry and then gently buff
with a soft cloth
COOKING TIPS, INFORMATION
WARNING: DEEP-FRYING CRAZE
People can do themselves serious injury attempting to
deep-fry their turkey. In the past deep-frying has burned down
houses and put cooks in hospital.
Deep-fried turkey is juicy, and better tasting. However with
this high risk method of cooking, besides the above, your turkey
can end up charred by the resulting inferno.
There is an advantage of deep-frying due to its speed. Cooking time is
3 1/2 minutes per pound. A big turkey is done in less then an
hour. If you are going to deep-fry your turkey use a commercial
pressurized fryer, rather than vats on a stand.
An uncovered pan with a rack in the bottom gives the best
results in roasting. Cooking time varies with preference.
For rare meat, 16 minutes per pound.
For medium meat, 22 minutes per pound.
For well done meat, 30 minutes per pound.
Add salt during or after cooking, not before. The salt flavour
does not penetrate more then 1 inch. If the meat does not reach
the desired colour during roasting, increase the heat to (500 F)
for a few minutes before removing from the pan.
Methods of searing is subjecting the meat to a high temperature
until it is nicely browned.
By Browning in an uncovered pan in a hot oven (450 F-500F).
By Browning in hot fat in a frying pan on the surface burner.
By Adding boiling water and cooking at boiling temperature until
the outside of the meat has lost its red colour.
Reasons For Cooking Meat
To develop flavour.
To soften the connective tissue when present in large quantity.
To kill any living organisms that may be present.
To make meatballs of even size, spread mixture in an ice cube tray and press the
divider down to separate meat into uniform squares.
Take out divider and shape squares lightly into balls.
Add a few drops of vinegar or lemon juice when making blueberry pie.
Gives the flavour a pleasant lift.
When it comes to food, healthy living, etc., generally the information
apply to both Canada and The U.S.A.
Canadas Food Guide to Healthy Eating and the Food Safety and Nutritious Programs provide guidelines for save and nutritious eating to help improve and protect your health.
Visit www.hc-sc.gc.ca
You will also find links to other sites in reference to food.
Healthy Eating.
www.hc-gc.ca/nutrition
Food recalls and allergy alerts.
www.cfia-acia.agr.ca
or
www.inspection.gc.ca
Click on food recalls and allergy warnings.
You can ask to be added to the automatic notification list.
Health and Disease Prevention Information.
www.canadian-health-network.ca
While at it why not check out the Guide to Active Healthy living. Click on;
www.paguide.com
You will also find links to other sites in reference to food.
I hope the above information will help you with some of your cooking
and cleaning chores around your home.
Disclaimer: The Author of this article is not responsible for accuracy or completeness nor shall he be held liable for any damage or loss arising out of or in any way related to the information or utilization of it.
Article Source: Bruce Chambers sold his printing, publishing, mail order business and retired in 1980. He came on the Internet in 2003. He researched for 1 year, and then started a free monthly Internet marketing report, plus free monthly recipes, bar mixes, tips newsletters. At present he resells from his website.
You can subscribe to either or both free newsletters by going to his web site. Please visit: http://www.cbestbuys.com
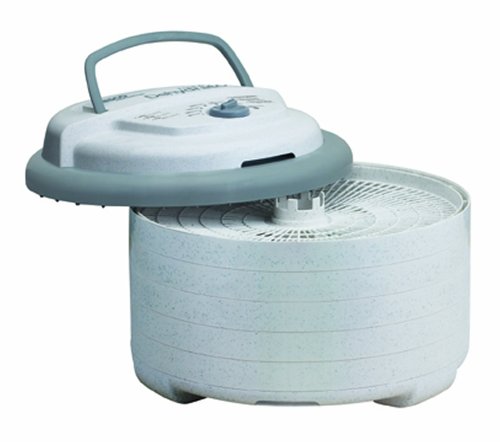
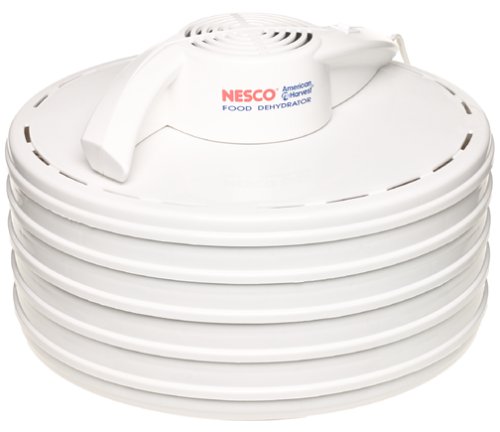
dehydrator
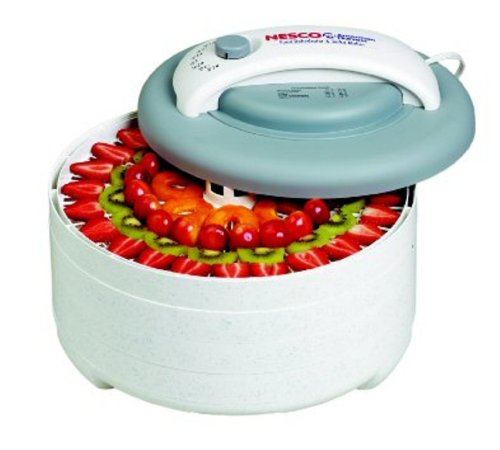 This convenient dehydrator makes great tasting, healthy snacks & jerky! Introducing the Snackmaster?? Encore???. It's Grey top and marbled design features 500 watts of drying power, and generates maximum speed and quality for dehydrating fruits, vegetables, beef jerky, and venison jerky. Helps dry food in hours, not days like ordinary food dehydrators. The top mounted fan eliminates the worry of liquids dripping into the the heating chamber!You can make delicious beef jerky, turkey jerky, fish jerky, trail mix, homemade yogurt, apple snacks, banana chips, dried soup mixes, dried tomatoes, watermelon, cantaloupe, honeydew, mangoes, papaya and other dried fruits at a fraction of the cost. Make dried herbs and spices; also make potpourri and dried flowers for any occasion.